Forms
Create a lead capture or back-in-stock form, build it step by step, choose when and where it appears, then publish it on your store.
A Fullmetrix form appears on your store to collect your visitors' email address, phone number or first name. Each submission creates or updates a contact in Fullmetrix, with their marketing consent and the tags you chose. Windows that open on their own need no code. The tracking script just has to be active on the store.
To open the page, click Forms in the Marketing group of the sidebar.
The two form goals
When you create a form, Fullmetrix asks for its goal. This choice sets the starting content and cannot be changed afterwards.
| Goal | What it is for | Starting content |
|---|---|---|
| Lead capture form | Collect your visitors' emails and phone numbers, for example a newsletter sign-up with a welcome code. | A "Stay informed" heading, a paragraph, an email field, a phone field, a consent checkbox and a Subscribe button. |
| Back in stock | Notify a customer when an out-of-stock product is available again. | A card for the product, a heading, a phone field, a consent checkbox and a Notify me when it's back button. |
A Back in stock form only appears on out-of-stock product pages. If the product has variants, the visitor picks the variant they are waiting for from a list of the sold-out ones. The back-in-stock message is then sent on WhatsApp by a WhatsApp automation that uses the back-in-stock trigger. For the full use case, read Back in stock.
The three display types
You set the display type in the builder, in the Style tab, with the Display type field. You can change it at any time.
| Type | What the visitor sees | How it reaches the store |
|---|---|---|
| Popup | A window in the center or a corner of the screen, with a dimmed background behind it. | Automatically, through the tracking script. |
| Flyout | A panel that slides in from an edge of the screen without dimming the page. The visitor can keep browsing. | Automatically, through the tracking script. |
| Embed | A form built into the page, exactly where you paste its code, for example in the footer or in a blog post. | Manually, by pasting the embed code into your theme. |
For Popup and Flyout, the Position grid offers nine spots, from top left to bottom right. Position does not apply to Embed, which takes the place you give it in the page.
Reading the forms list
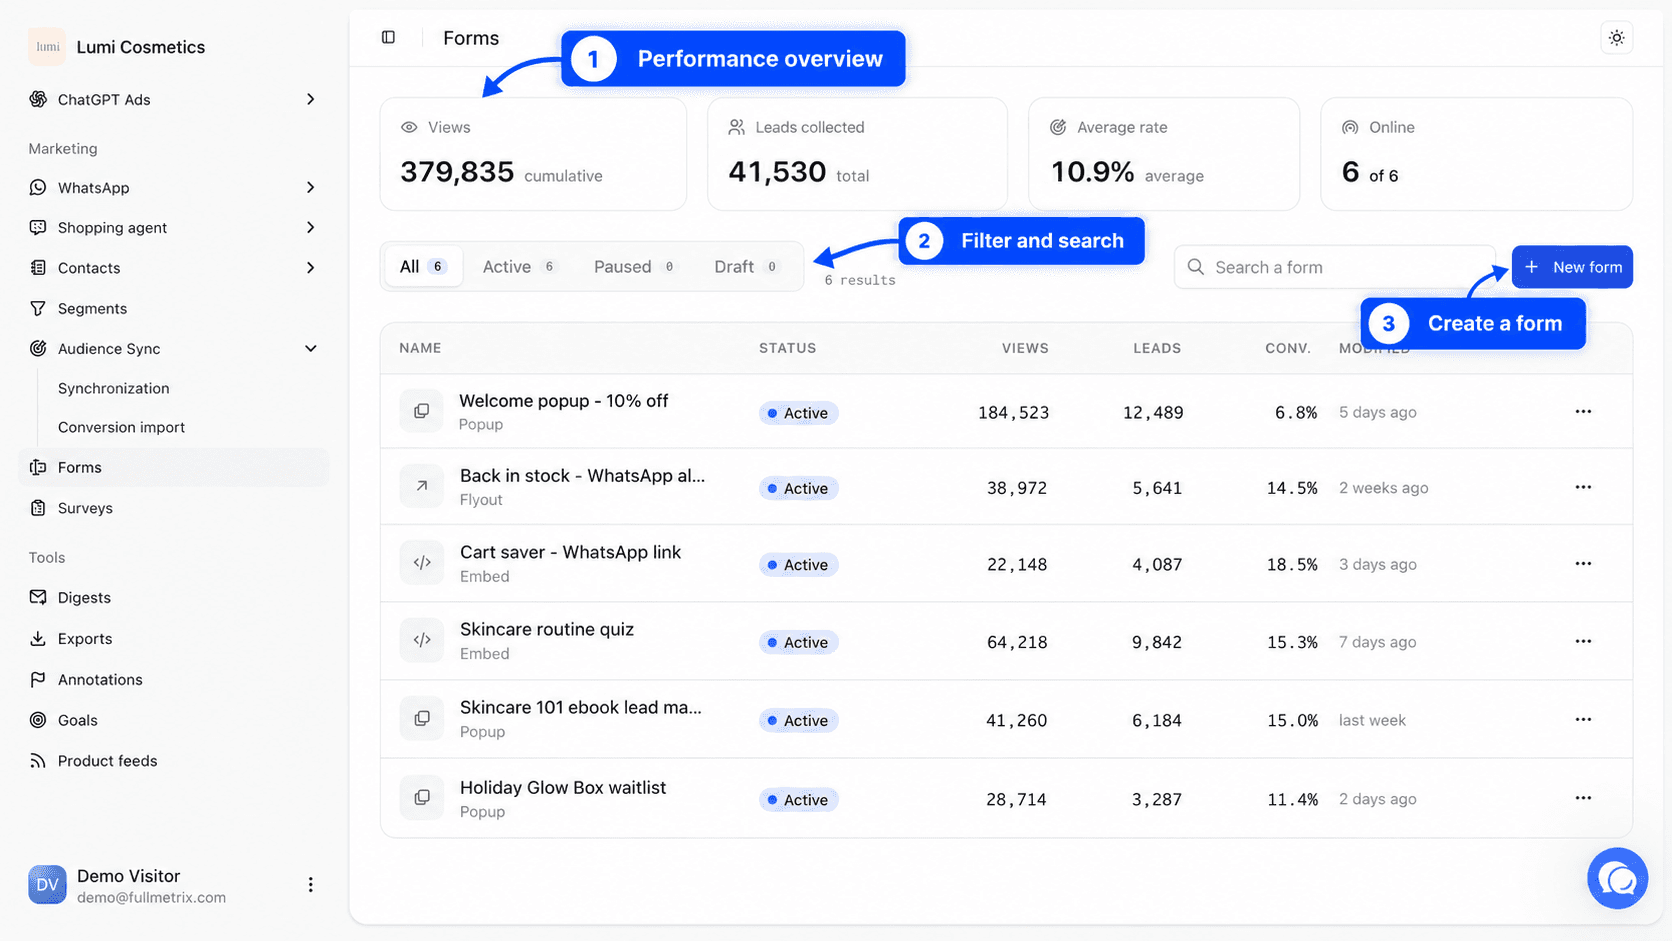
Until you have a form, the page shows No forms and a Create a form button. Once you have one, four cards appear at the top of the page.
| Card | What it counts |
|---|---|
| Views | The total number of times all your forms were displayed, since they were created. |
| Leads collected | The total number of submissions across all forms. |
| Average rate | Leads divided by views, as a percentage. |
| Online | The number of active forms, out of all your forms. |
Below the cards, the All, Active, Paused and Draft filters narrow the list to one status. The number next to each filter shows how many forms it holds. The Search a form field filters by name. If nothing matches, the list shows No form matches this filter.
The table has one row per form.
| Column | Content |
|---|---|
| Name | The form name and, below it, its display type. |
| Status | Draft until it has been activated once, Active when it is live, Paused when you stopped it. |
| Views | The number of times it was displayed on the store. |
| Leads | The number of submissions. |
| Conv. | Leads divided by views. A dash appears while the form has no views. |
| Modified | The last change, as relative time ("3 days ago"). |
Click a row to open the form in the builder.
Row menu actions
The three-dot button at the end of each row opens a menu.
- Edit opens the builder.
- Copy snippet only appears for an Embed form. It opens the Embed code window described below.
- Duplicate creates a Draft copy named after the original with "(copie)" added. The copy keeps the content, style, triggers, targeting, frequency, visibility and tags. Check the Scheduling and Sites groups afterwards, because they start empty.
- Statistics opens the Form statistics window.
- Export downloads every submission of the form as a CSV file.
- Activate puts a draft or paused form live. Pause removes it from the store without deleting anything.
- Delete asks for confirmation. The form and all its submissions are permanently deleted.
Deleting also erases submissions
If you only want to stop a form, choose Pause. Contacts already created stay in your contacts, but the form's submission history goes with it. Export it before deleting.
Reading a form's statistics
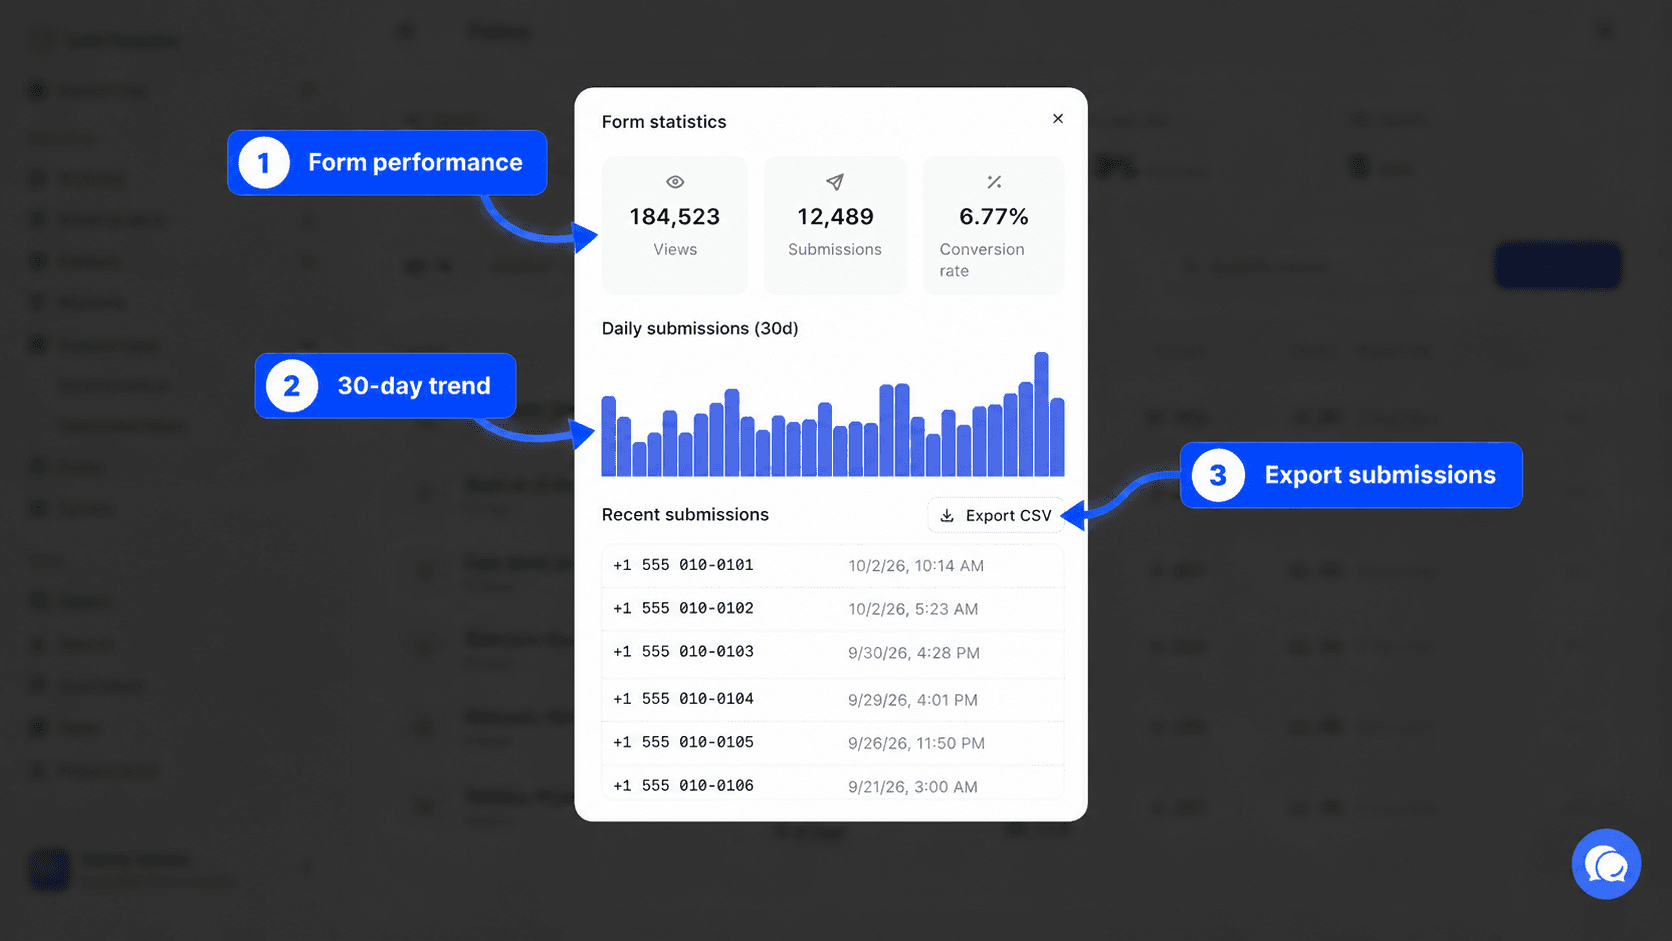
The Form statistics window shows Views, Submissions and Conversion rate, a Daily submissions (30d) chart and the list of Recent submissions. The Export CSV button downloads the submissions, like the Export menu action.
Creating a form
Open the creation window
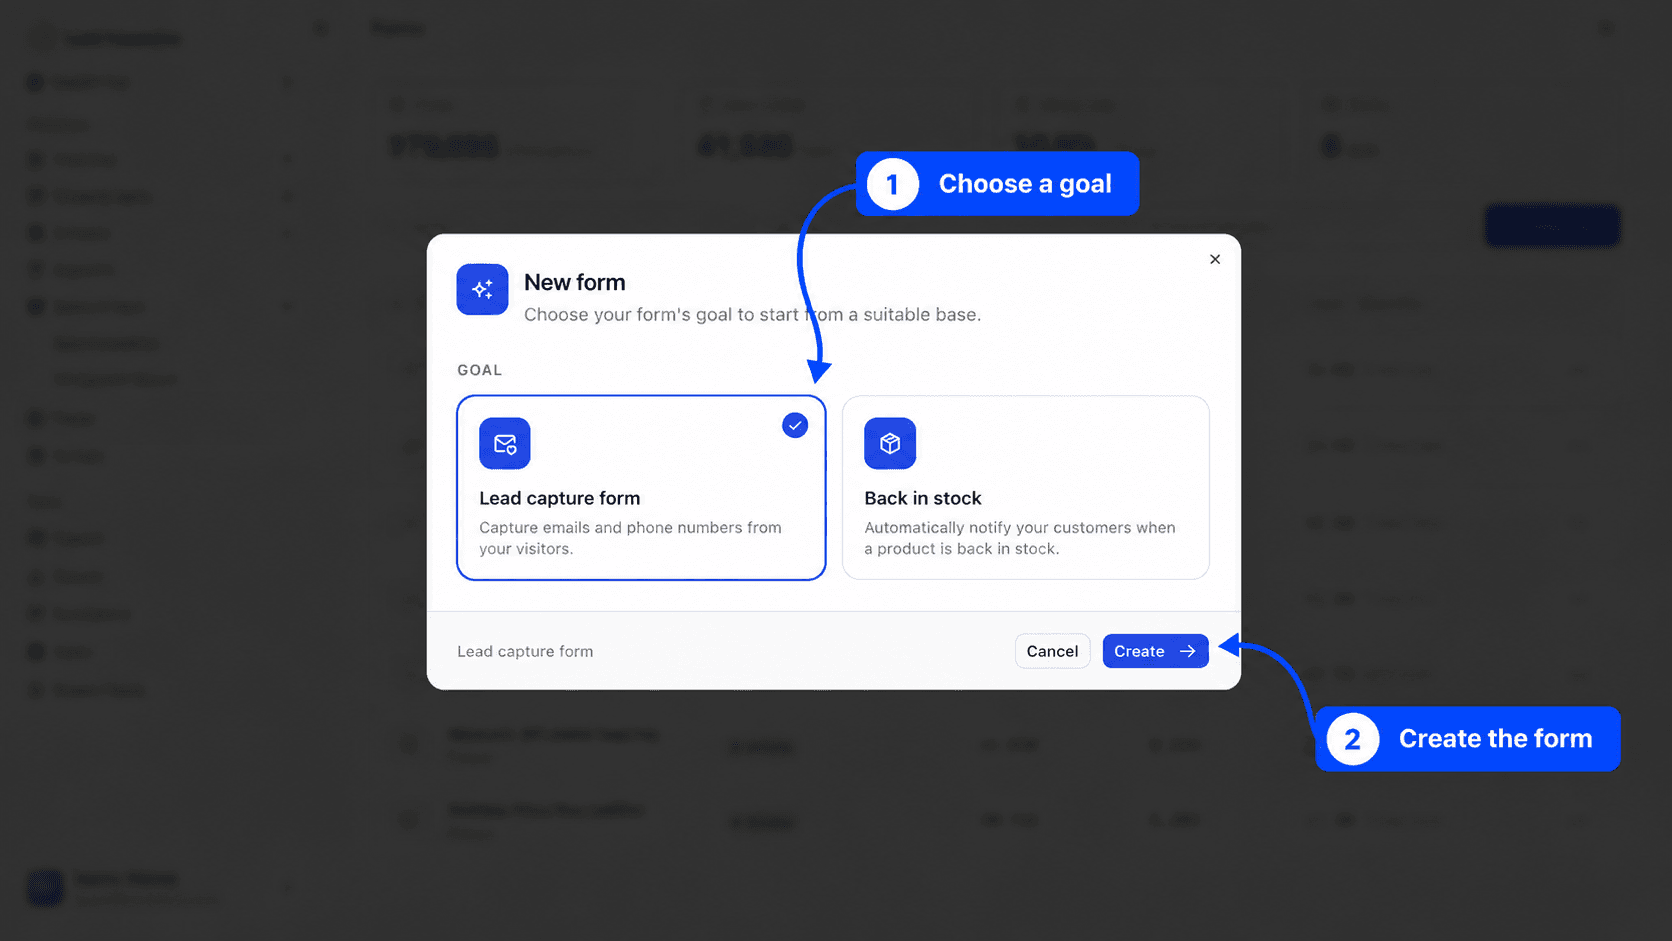
Click New form at the top right of the list, or Create a form if the page is empty. The New form window opens.
Pick the goal
Under Goal, click Lead capture form or Back in stock. The selected card gets an outline and a check mark.
Confirm
Click Create. The builder opens full screen. The form gets an automatic name, such as "Form 3" or "Back in stock 2", which you can change at the top left. It starts as a Draft with the Popup type, so nothing shows on the store yet.
Building the form in the builder
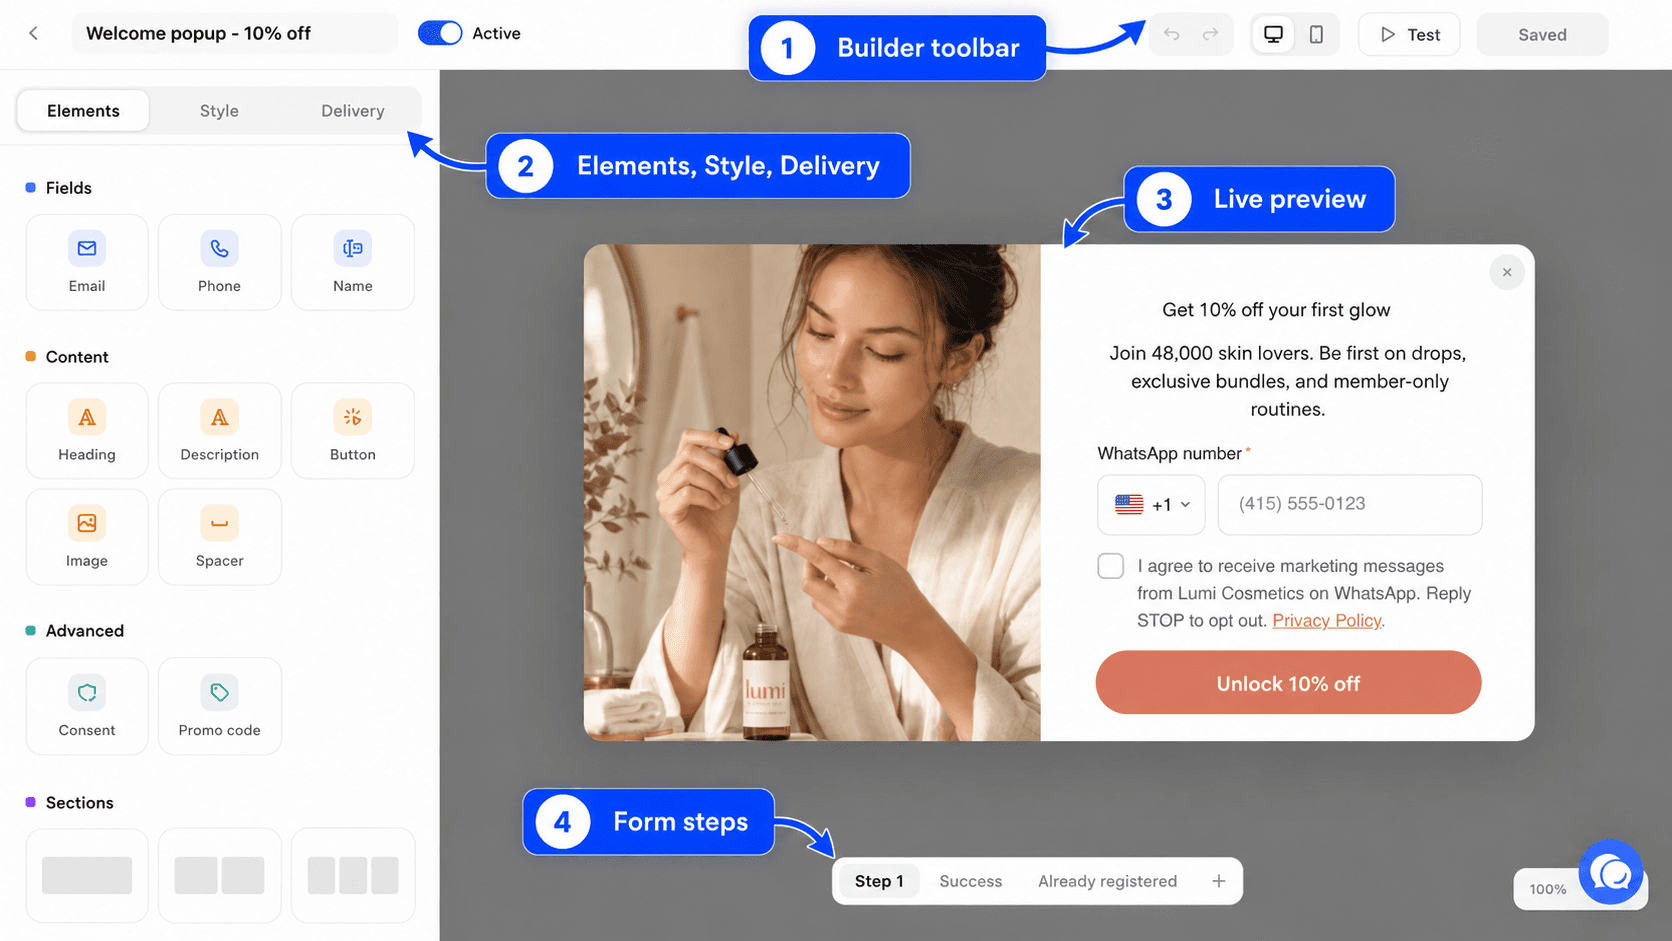
The builder has three areas. At the top, the toolbar. On the left, a panel with three tabs, Elements, Style and Delivery. In the center, the form preview, where you click to select an element. The left panel only shows on a wide screen, so work on a computer.
The toolbar
| Item | What it does |
|---|---|
| Back arrow | Returns to the list. If you have unsaved changes, Fullmetrix offers to save or discard them. |
| Form name | Click it to rename the form. The name is saved as soon as you leave the field. Only you see it, inside Fullmetrix. |
| Active or Inactive switch | Puts the form live or pauses it, without going back to the list. |
| Undo and Redo | Step back or forward through your changes. Ctrl+Z and Ctrl+Shift+Z (Cmd on Mac) do the same. |
| Desktop and Mobile | Change the preview width. In mobile, the preview is 375 pixels wide. |
| Test | Saves the form, then opens it in a new tab exactly as it will appear, so you can fill it in and check its behavior. |
| Save | Saves your changes. The button reads Saved when there is nothing new. Ctrl+S (Cmd+S on Mac) does the same. |
Saving does not publish
Your changes only show on the store once saved, and only if the form is Active. A saved draft stays invisible to your visitors.
Form steps
Below the preview, tabs stand for the steps the visitor goes through.
- Step 1 is the form the visitor fills in.
- Success is the screen shown after a successful submission. By default it reads "Thank you!".
- Already registered is the screen shown when the person has already signed up. For a lead capture form, that happens when the email or number has already received this form's unique discount code. For a Back in stock form, it happens when the number is already waiting for this product.
The Add button inserts a new step before Success. For example, step one asks for the email, step two asks for the phone number and shows the discount code. To remove an added step, click the Remove step icon on its tab.
Adding sections and elements
When nothing is selected, the Elements tab shows the palette. Drag an element onto the preview, or click it to add it.
The Sections group adds a row with a column layout, One column, Two columns, Three columns, Mixed left, Mixed right or Four columns. Elements then go into these columns.
Elements come in three families.
| Family | Element | Use |
|---|---|---|
| Fields | Collects the email address. Required by default. | |
| Phone | Collects the number, with a country picker. Set the Default country in the properties. | |
| Name | A text field for the first or last name. The Field name setting tells which one it collects. | |
| Content | Text | A heading, paragraph or note, with five styles from Heading large to Footnote. |
| Button | Submits the form (Submit action) or opens an address (Link action). | |
| Image | Shows an image or banner, with an optional link on click. | |
| Spacer | Adds vertical spacing. | |
| Product | Only for a Back in stock form. Shows the image and name of the awaited product. | |
| Advanced | Consent | A consent checkbox, with a link to your privacy policy. |
| Promo code | Shows a discount code the visitor can copy. |
Click an element in the preview to show its settings in the left panel. The two icons at the top of the panel duplicate or delete it. You select a section the same way to set its background, padding and content alignment.
Setting up consent
The Consent element is the box the visitor ticks to accept your marketing messages. In its properties, Channels covered by this consent says what they agree to, Email, WhatsApp or SMS. Consent is saved on the contact for each ticked channel. Also fill in Privacy link with the address of your privacy policy.
If your form has no Consent box, contacts are created without marketing consent.
Showing a discount code
The Promo code element works in two ways.
By default, it shows a fixed code you type in Promo code, for example WELCOME10. This code must already exist in your store.
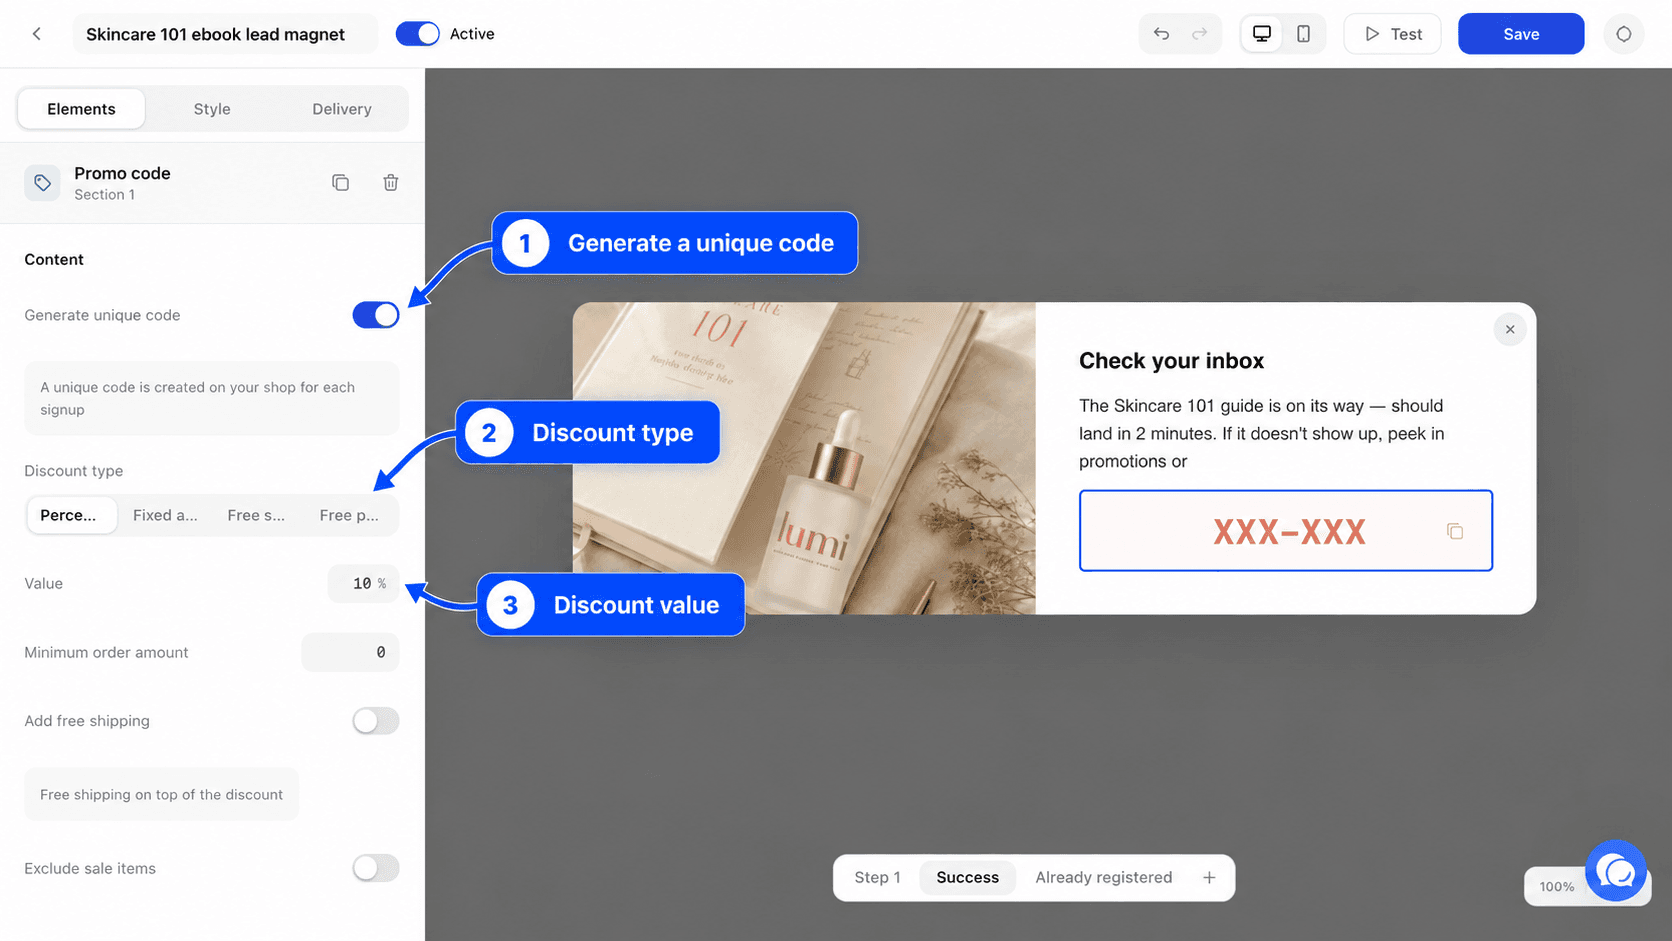
If you turn on Generate unique code, Fullmetrix creates a different code in your store for every sign-up. You then set the Discount type (Percentage, Fixed amount, Free shipping or Free product), the Value, the Minimum order amount, the Validity in days and a Fallback code, shown if generation fails. Depending on your platform, two more options appear, Add free shipping and Exclude sale items.
Three rules apply to the discount code.
- It cannot be shown on the first step. Put it on step two or later, after you collect the address.
- A unique code needs an Email or Phone field on an earlier step.
- A unique code needs a connected store.
If one of these rules is broken, Fullmetrix refuses to activate the form and shows the matching message, for example "The discount code cannot be displayed on the first step.". The same email or number only gets one unique code per form. On a second try, the visitor sees the Already registered step.
Customizing the look in the Style tab
The Style tab sets the look of the whole form.
- Surface holds the Display type, the Width (280 to 1,000 pixels), the background color, the corner radius, the border and, for Popup and Flyout, the Position. For an Embed form, this is also where the Embed code appears.
- Visual places an image left, right, above or below the content, with a ratio. Then click the image area in the preview to pick the file or paste an address. Images can be JPG, PNG or GIF, up to 2 MB and 2,000 pixels.
- Spacing, Typography and Shadow set the inner padding, the gap between elements, the font and the drop shadow.
- Buttons, Fields and Close set colors, sizes and the position of the close button.
Check the Mobile preview before you publish.
Choosing when and where the form appears in the Delivery tab
The Delivery tab decides who sees the form, when, and on which store.
Triggers
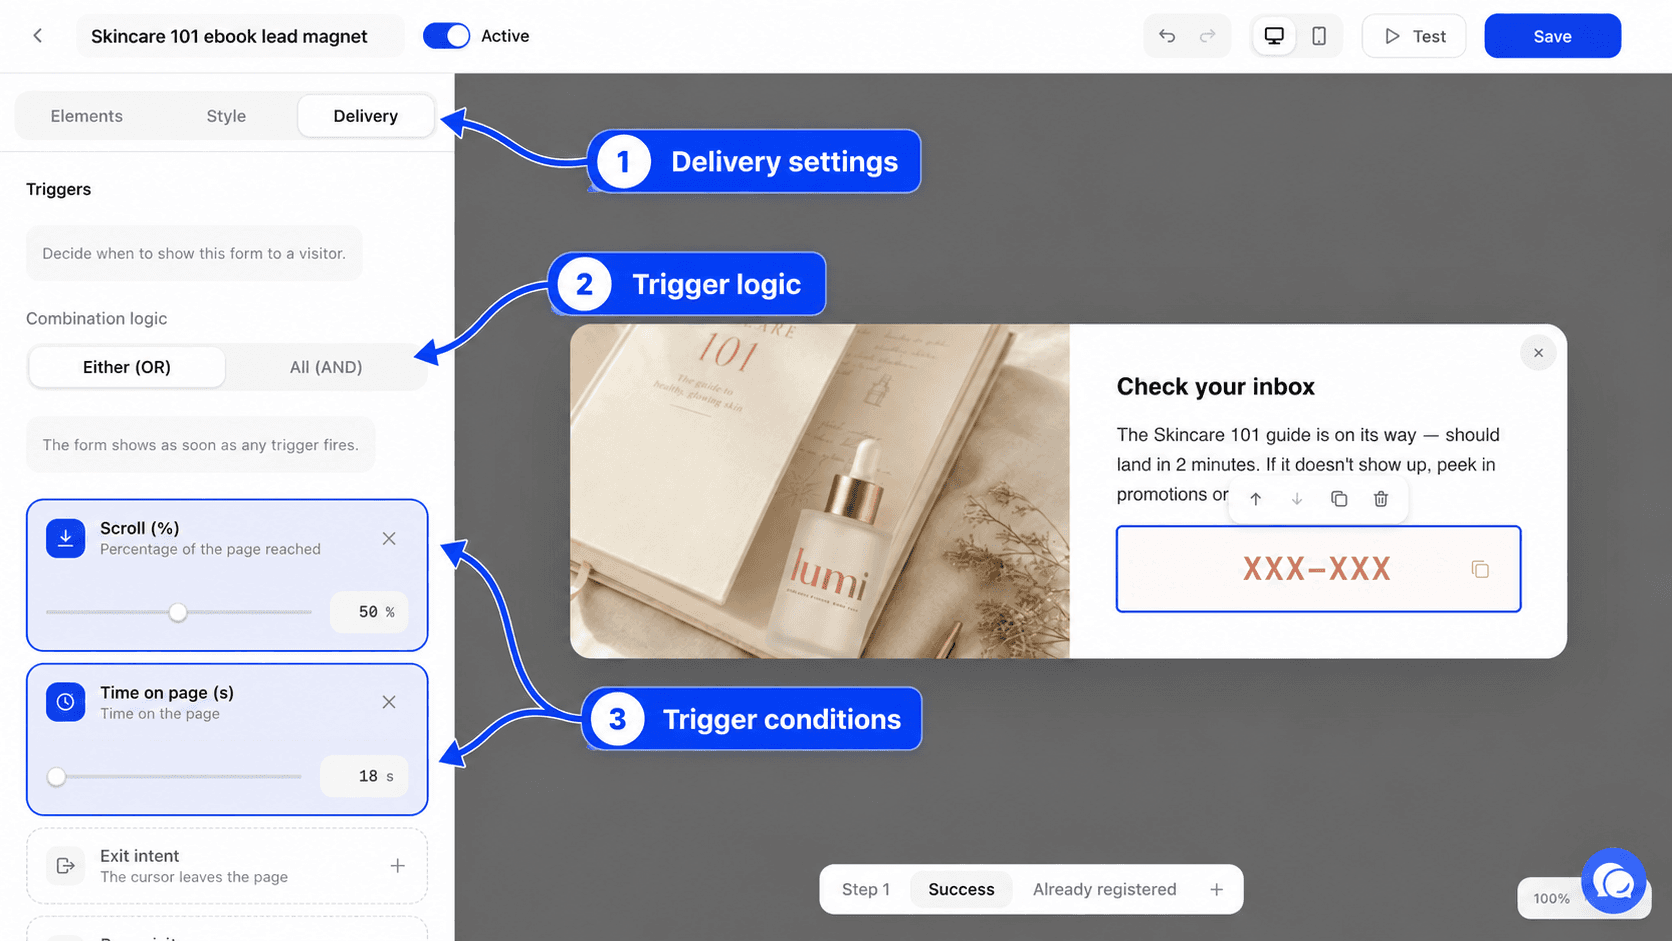
Without a trigger, the form shows as soon as the page loads. Click Add a trigger to wait for a specific behavior.
| Trigger | What it waits for | Value |
|---|---|---|
| Exit intent | On desktop, the cursor leaves through the top of the page, toward the tabs or the address bar. On mobile, the visitor leaves the tab or the app. | None |
| Scroll (%) | The visitor has scrolled through this percentage of the page. | 1 to 100, 50 by default |
| Time on page (s) | The visitor has stayed this many seconds. | 1 to 3,600, 5 by default |
| Page visits | The visitor has viewed at least this many store pages, from the same browser. | 1 to 100, 3 by default |
| Inactivity (s) | The visitor has done nothing for this many seconds. | 1 to 600, 30 by default |
With several triggers, Combination logic decides when the form shows. Either (OR) shows it as soon as one trigger fires. All (AND) waits until all of them have fired.
Trigger button, for back in stock
A Back in stock form has a Trigger button group. Once it is on, the store shows a button and the form only opens when the visitor clicks it. Triggers and frequency are then ignored.
- In Floating mode, the button stays fixed at the bottom of the screen, Bottom left, Bottom center or Bottom right.
- In Embedded mode, the button sits next to the "Add to cart" button on your product page. Enter the CSS selector for the "Add to cart" button, for example
.single_add_to_cart_buttonon WooCommerce or#add-to-carton PrestaShop, then the Placement (After the button, Before the button or In place of the button). If the selector is not found on the page, the floating button takes over.
You also set the Button text, its colors, its radius and its padding.
If no WhatsApp back-in-stock automation is active, a warning shows at the top of the tab. Sign-ups are still saved, but no message is sent until the automation is active.
Targeting
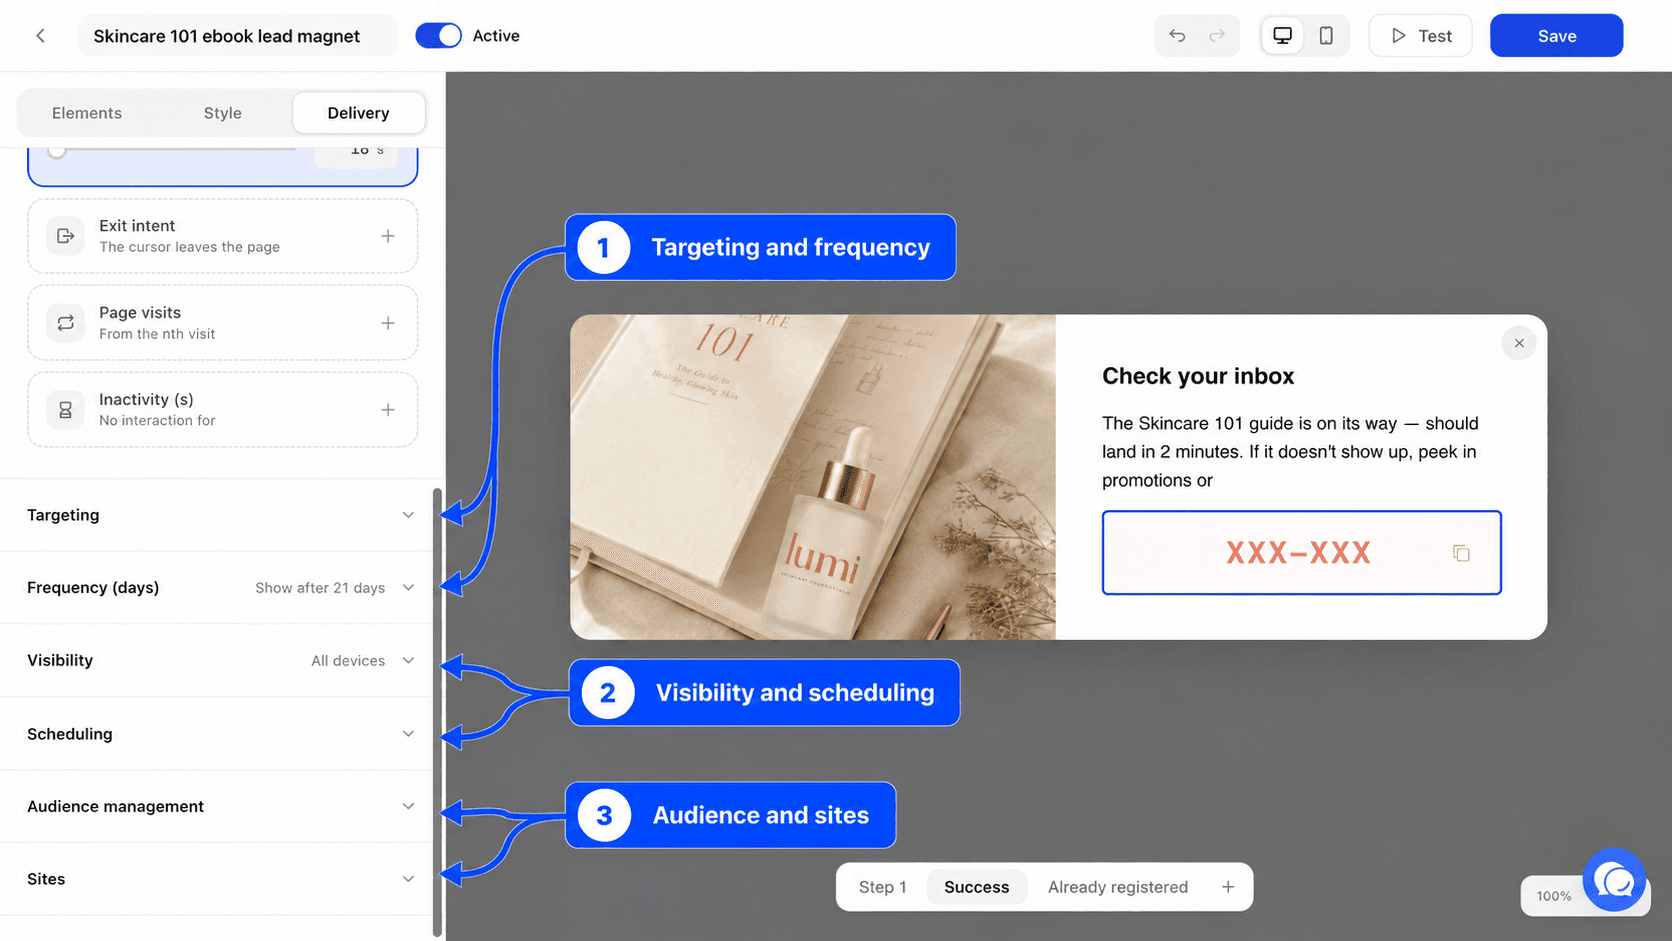
Specific pages limits the form to pages whose address matches at least one rule. Click Add a URL, choose a Match type (Contains, Exact, Starts with or Regular expression), then enter the value. With no rule, the form can show on every page. An invalid or overly complex regular expression blocks saving until you fix it.
For a Back in stock form, do not add any rule. It already only shows on out-of-stock product pages.
Frequency
Days between displays sets how many days to wait before showing the form again to a visitor who saw or closed it without signing up. Use 0 to show it on every visit. The maximum is 365 days.
Show again after submission is off by default, so a visitor who filled in the form never sees it again. Turn it on only if you want them to be able to sign up again.
Visibility, scheduling, tags and sites
- Visibility limits the form to All devices, Desktop only or Mobile only.
- Scheduling sets a Start date and an End date, for example for a sale. After the end date, the form no longer shows.
- Audience management adds tags to everyone who signs up through this form. Type a tag and confirm. These tags appear on the contact record and help you build segments. Read Tags to manage them.
- Sites picks the stores where the form shows, if you have several. If no store is checked, the form shows on all connected stores.
Publishing the form on your store
A Popup or Flyout form reaches the store through the Fullmetrix tracking script. You have no code to add.
Check the tracking script
Open Settings, then Tracking, and check that tracking is active on the store. The Site tracking page covers the installation.
Save and activate
In the builder, click Save, then turn the switch to Active. The Activate action in the list does the same.
Check it on the store
Open your store in a private browsing window and trigger the form according to your settings. A private window prevents an earlier display or submission from blocking it.
What happens to submissions
On each submission, Fullmetrix creates the contact, or completes it if it already exists with the same email or number. It saves consent per channel and adds the tags from the Audience management group. You find these people in All contacts and can send them to an ad audience or an email tool with audience sync.
Phone numbers are saved in international format, with the country code chosen in the field.
Useful form examples
Sign-up with a welcome code. Step one with a heading, an Email field and a Consent box covering Email. Step two with a Promo code set to Generate unique code, 10% off, valid for 30 days. Time on page (s) trigger at 10 seconds and frequency at 7 days.
Exit window on the cart. A Flyout with the Exit intent trigger, a Contains cart rule in Specific pages, and an exit-cart tag in Audience management so you can find these contacts in a segment.
WhatsApp back-in-stock alert. A Back in stock form with a Trigger button in Embedded mode, placed After the button "Add to cart", and an active WhatsApp back-in-stock automation.