Import
Add contacts by hand, by CSV file or by pasting, prepare your file in the right format and follow your import history.
The Import page brings into Fullmetrix people who do not come from your store. For example a list of leads collected at a trade show, the subscribers of a former newsletter tool or a customer you met in your shop. Once imported, these people appear in All contacts, can receive tags and enter your segments.
To open the page, click Contacts in the Marketing group of the sidebar, then Import.
The import history
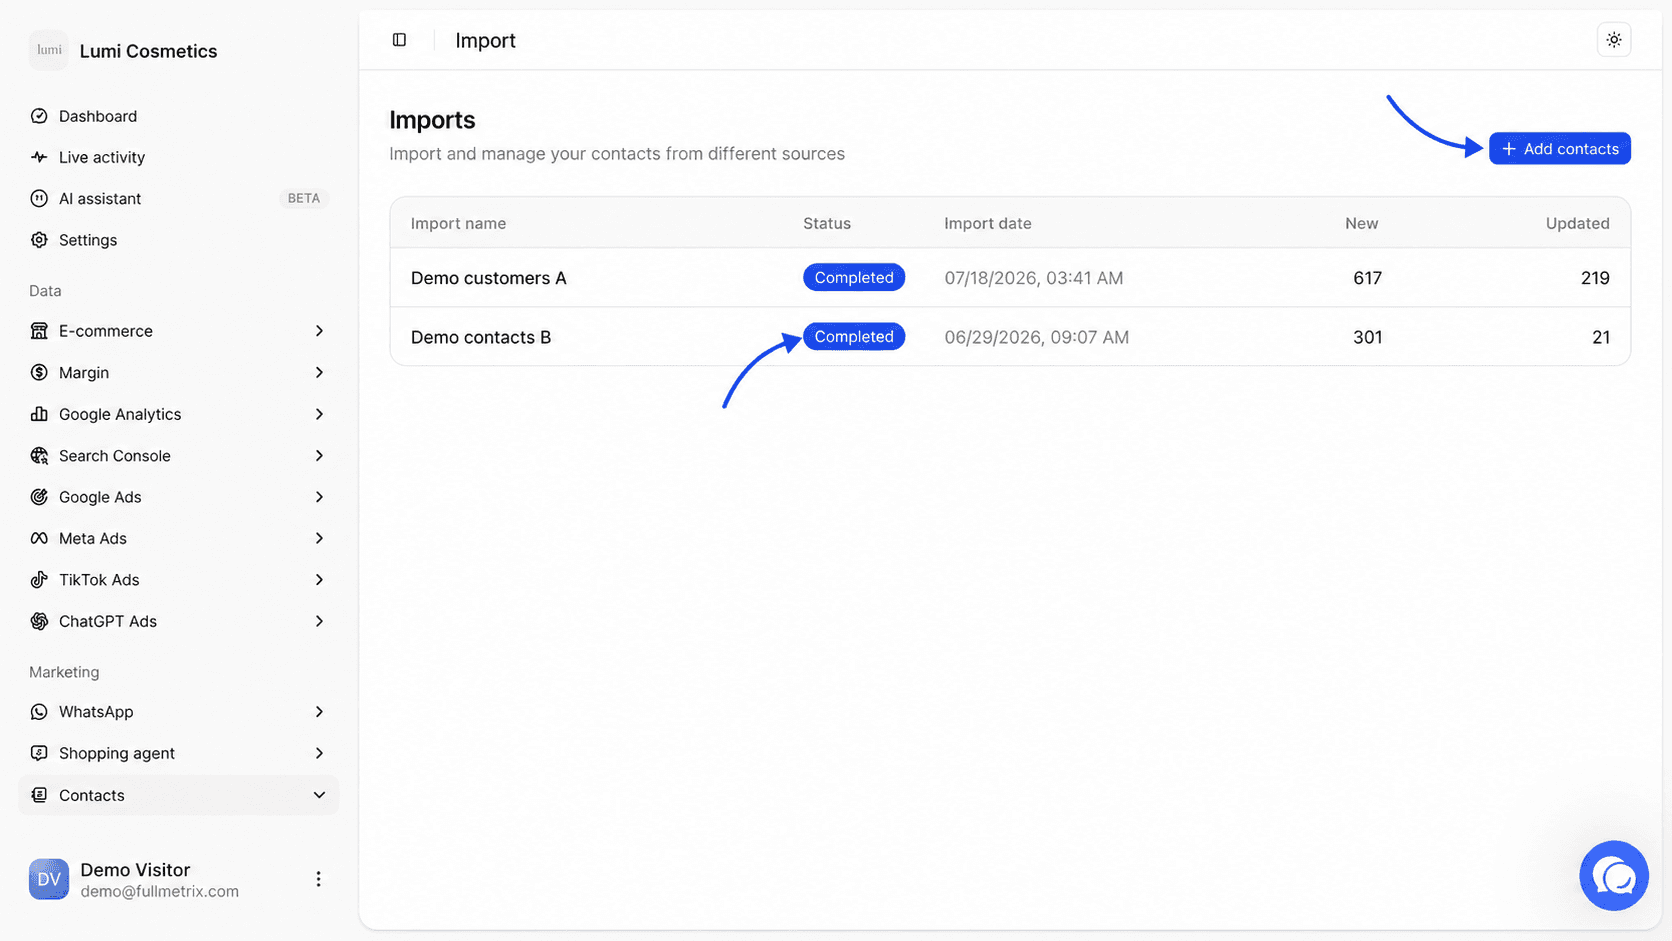
The page is titled Imports. It lists every addition made in your organization, newest first, whether it was a file, a paste or a contact added by hand.
| Column | Content |
|---|---|
| Import name | The name of the imported file, "Pasted import" followed by the date for a paste, or the email (or the WhatsApp number if there is no email) for a single contact. |
| Status | Completed, Processing or Failed. |
| Import date | The date and time the import started, in your organization's time zone. |
| New | The number of contacts created. |
| Updated | The number of contacts that already existed and were updated. |
The list shows 20 imports per page. When there are more, pagination appears below the table.
Until you import anything, the page shows No import with the message Import your first contacts to get started and the Add contacts button.
Choose how to add your contacts
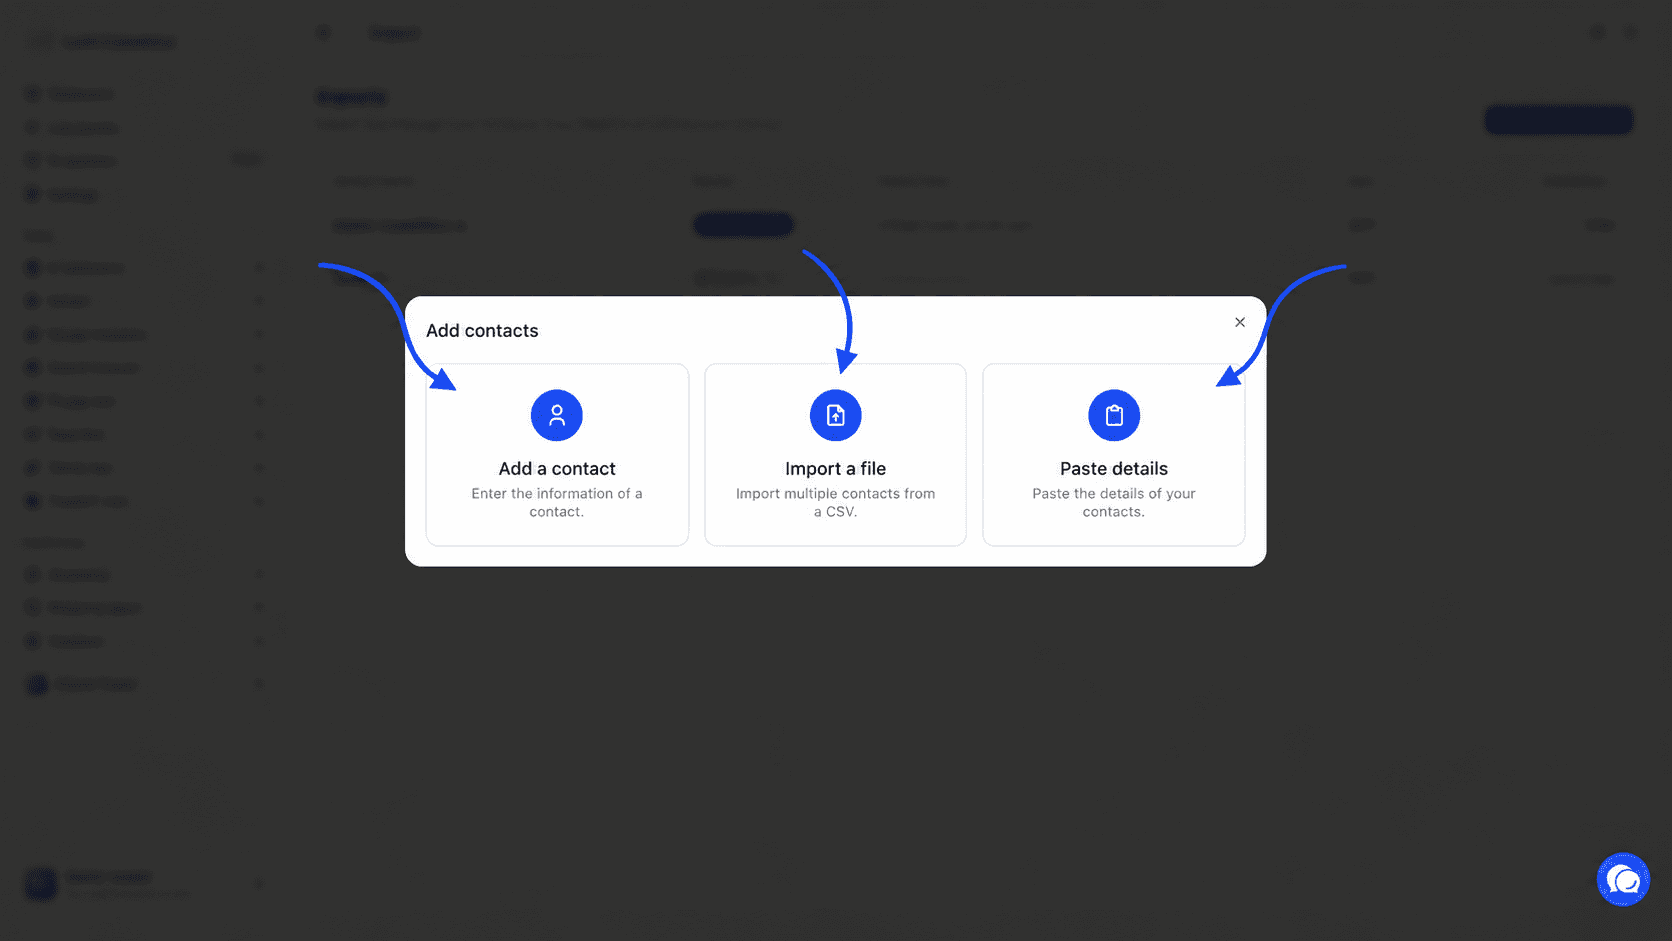
Click Add contacts at the top right. The Add contacts window offers three choices.
- Add a contact to enter a single person.
- Import a file to upload several contacts from a CSV file.
- Paste details to paste a list copied from a spreadsheet or an email.
The same button appears on the All contacts page and on the Tags page when they are empty.
Add a single contact
Choose Add a contact. The Contact information form opens.
Enter the identifier
Fill in Email address, WhatsApp, or both. At least one is required, otherwise the message Please enter an email or a WhatsApp number appears. Enter the number in international format, for example +33612345678.
Add details if needed
Click More fields to show First name, Last name, Company, City and Country. Fewer fields hides them again.
Add tags
In Add tags, type a tag name then click Add or press Enter. You can add several. Each tag is saved in lowercase.
Choose subscriptions
In Subscriptions, tick Subscribe to emails and or Subscribe to WhatsApp if the person agreed to receive your marketing messages on that channel.
Save
Click Add contact. The message Contact added successfully confirms the creation.
If a person with the same email or the same WhatsApp number already exists, we update them instead of creating a second one. The fields you filled in replace the old ones, the tags are added to the ones they had, and the message becomes Contact updated successfully.
Import a CSV file step by step
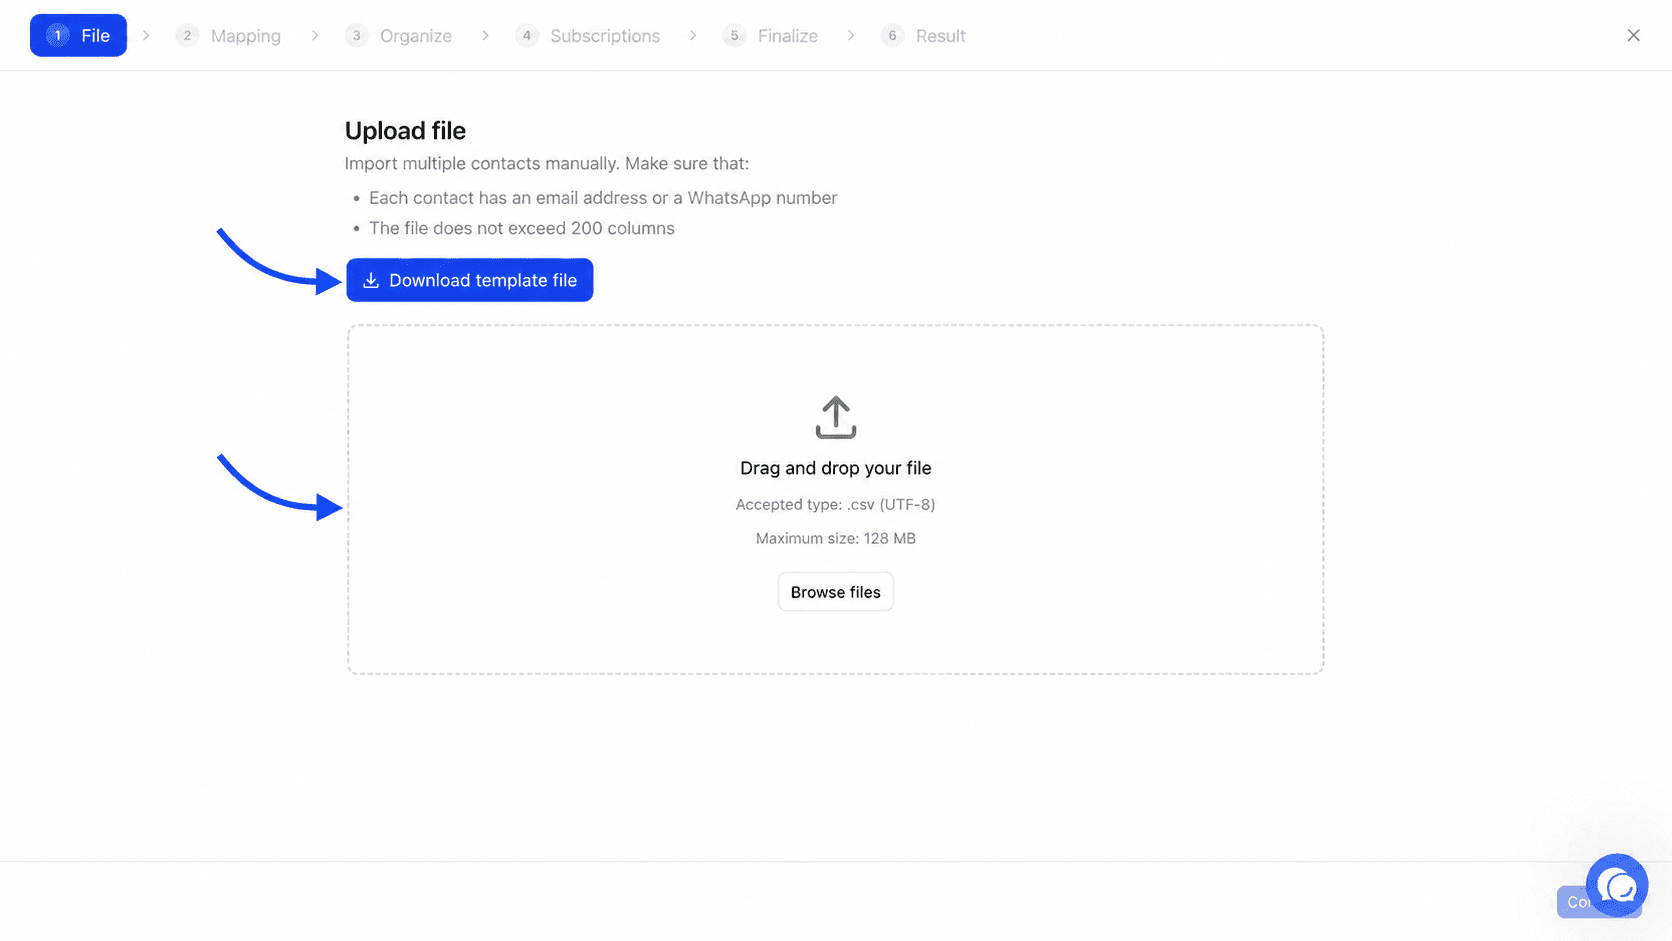
Choose Import a file. The import opens full screen with six steps at the top, File, Mapping, Organize, Subscriptions, Finalize and Result. The Back button at the bottom left returns to the previous step, and you can also click a step you already completed. The cross at the top right closes the import without saving anything.
Upload the file
The Upload file screen recalls the two conditions to meet. Each contact has an email address or a WhatsApp number, and the file does not exceed 200 columns.
Drop your file in the Drag and drop your file area or click Browse files. The file must be a .csv encoded in UTF-8 and weigh 128 MB at most. Once the file is read, its name shows with the label File loaded. The Change button lets you pick another one.
If you start from scratch, click Download template file. You get a fullmetrix-import-template.csv file with the right columns and two sample rows.
Map columns to properties
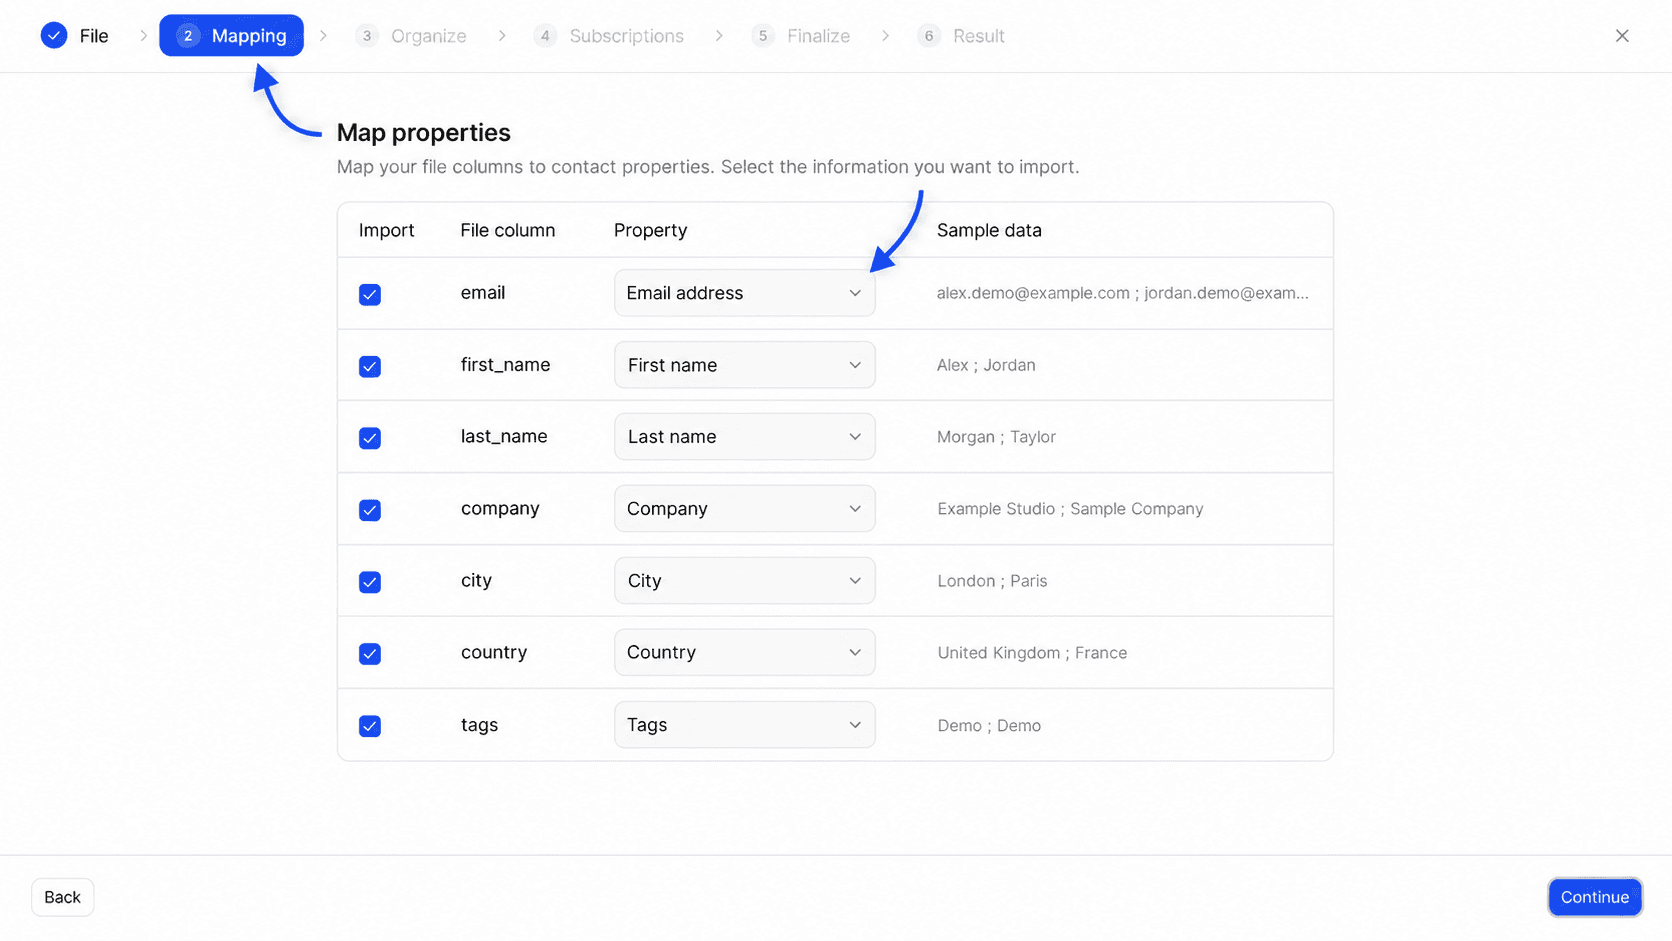
The Map properties screen shows one row per column of your file.
- The Import checkbox tells whether the column will be imported.
- File column shows the header from your file.
- Property is the contact field that will receive the value. Choose Do not import to skip the column.
- Sample data shows the first values of the column so you can check you are not mixing things up.
We prefill the property when the header is recognized (see the table further down). Each property can be chosen only once. The Continue button stays greyed out until a column is mapped to Email address or WhatsApp.
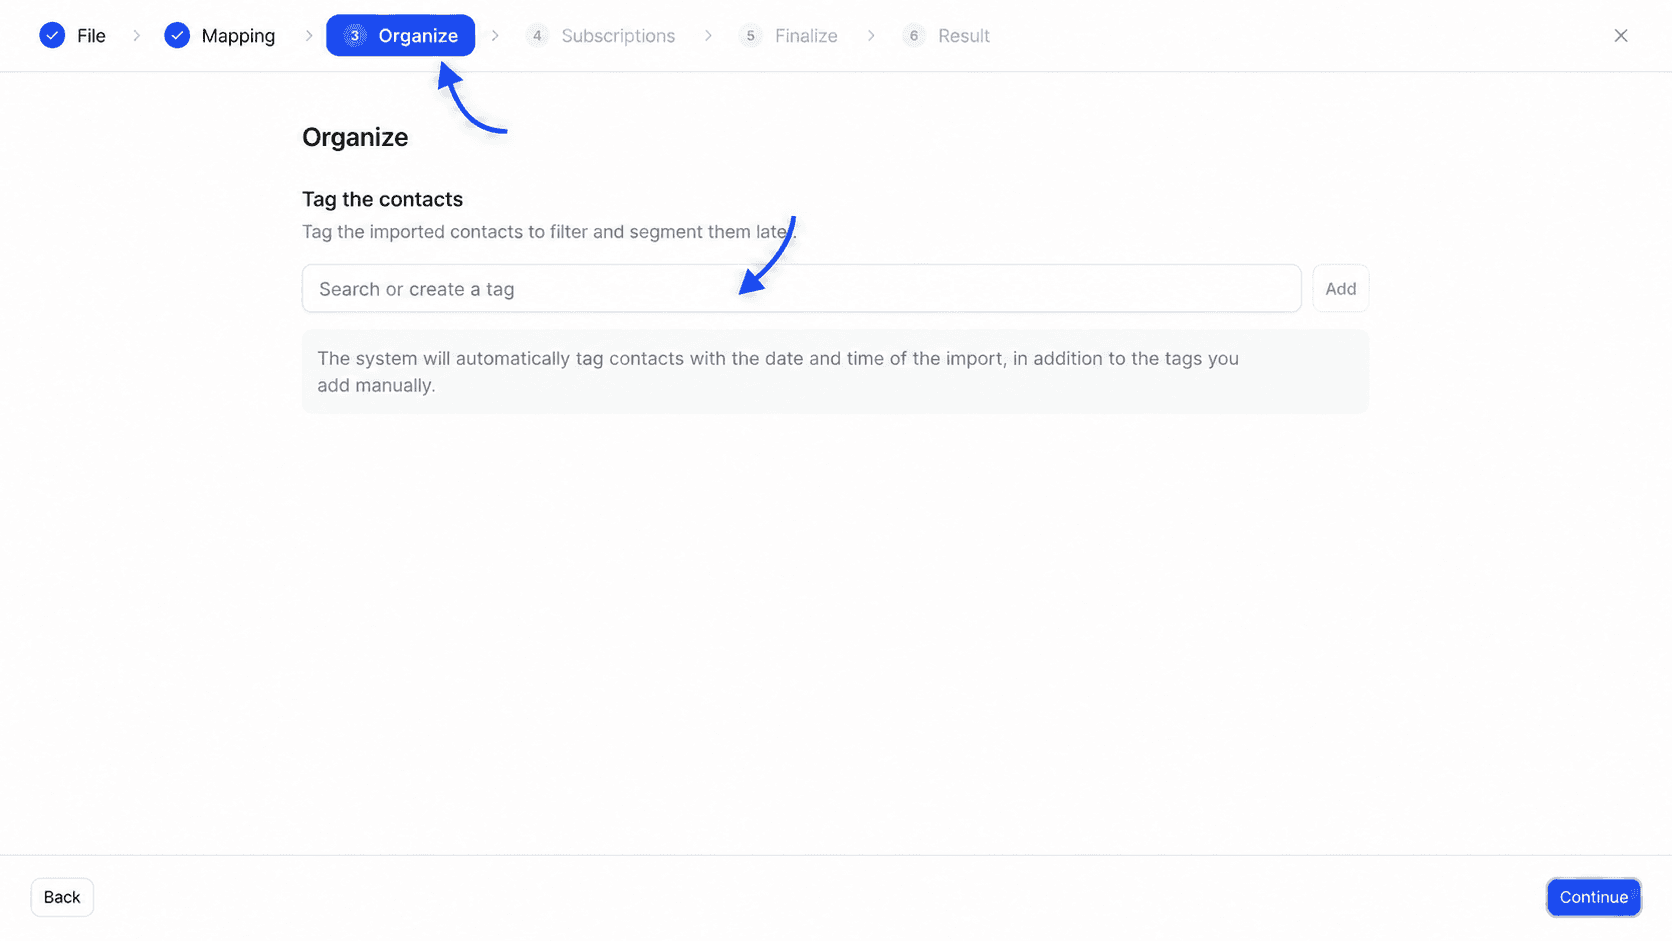
Tag the imported contacts
The Organize screen lets you add tags to every contact in the file. Type a name then click Add. These tags then help you find this group in filters and segments.
We also add an automatic tag with the date and time of the import, in the form import-2026-10-02-14h30. The time is in Coordinated Universal Time (UTC). This tag lets you find exactly the people from a given import.
Choose subscriptions
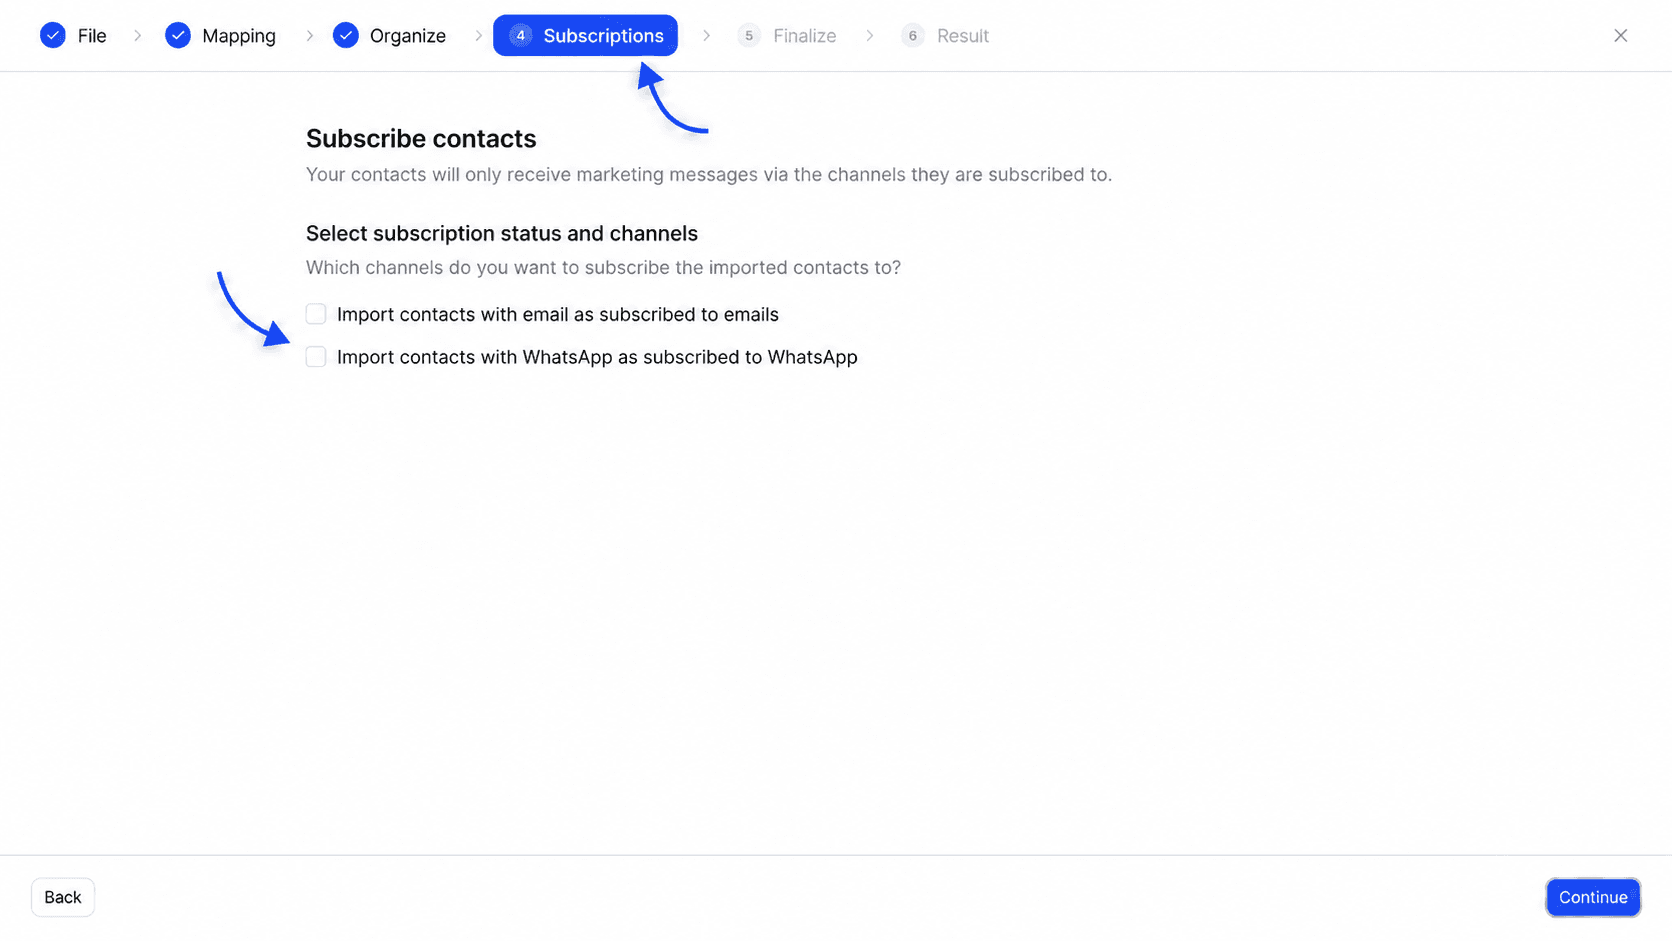
The Subscribe contacts screen reminds you that your contacts will only receive marketing messages on the channels they are subscribed to. Two boxes are offered.
- Import contacts with email as subscribed to emails
- Import contacts with WhatsApp as subscribed to WhatsApp
Only tick a box if the people in the file gave their consent for that channel. Both boxes are unticked by default.
Handle duplicates and empty fields
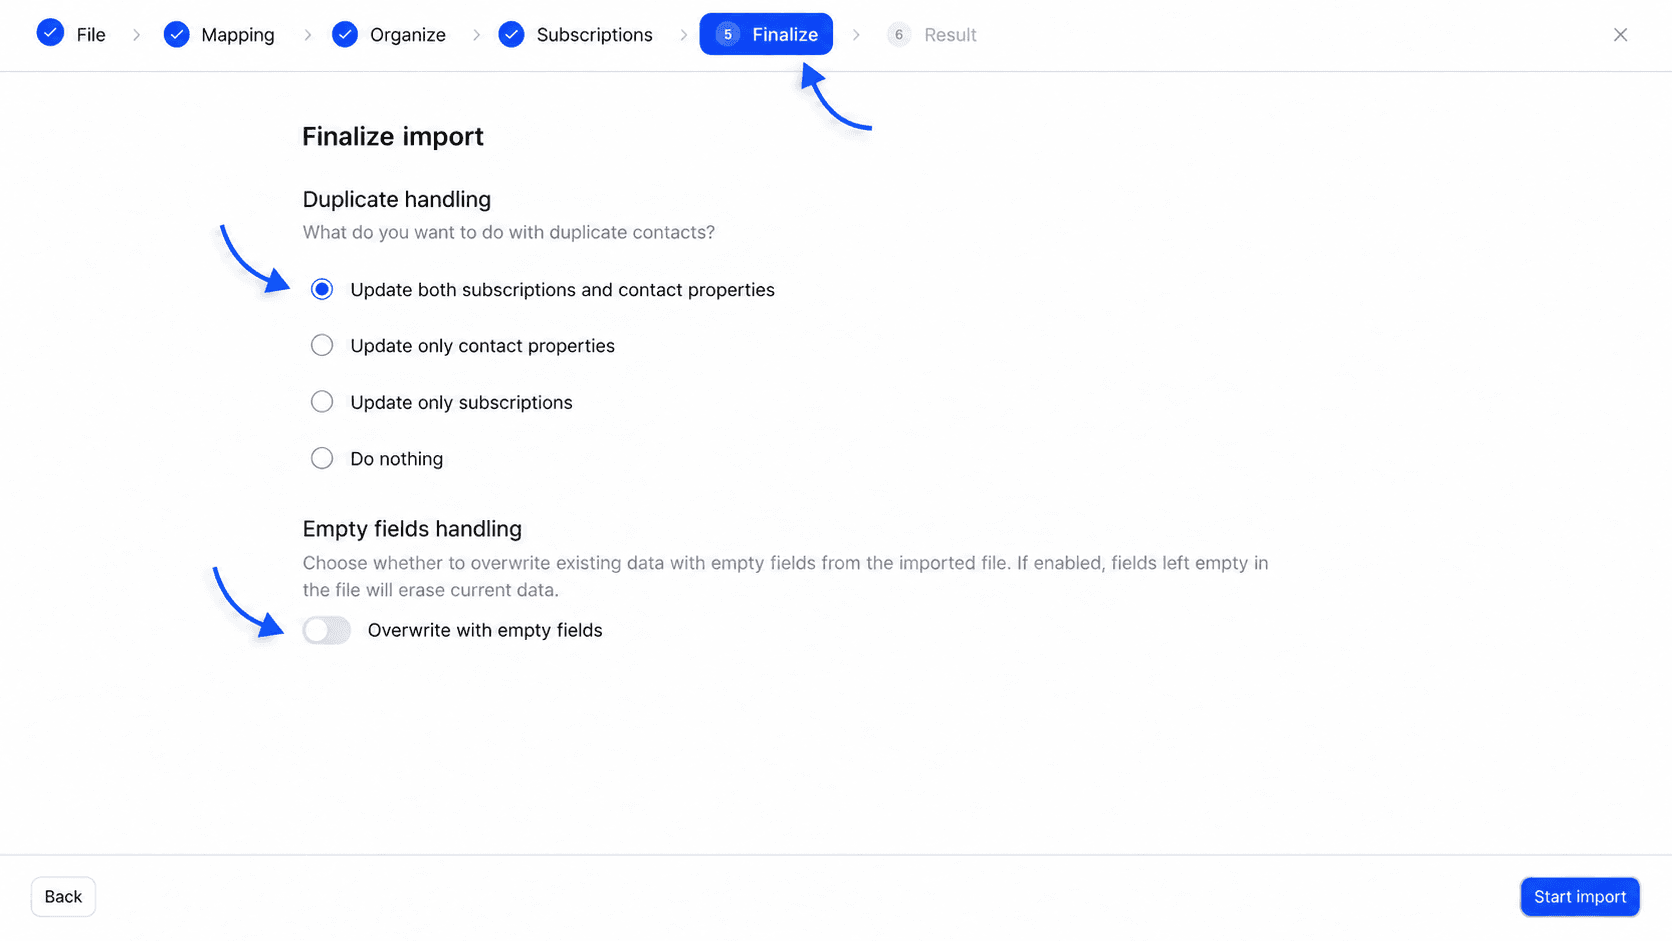
The Finalize import screen sets what happens to people we already know. A contact counts as a duplicate when its email, or failing that its WhatsApp number, already exists in your organization.
Under Duplicate handling, pick an option.
| Option | Effect on an existing contact |
|---|---|
| Update both subscriptions and contact properties | Default choice. Values from the file replace the old ones and the subscriptions ticked at the previous step apply. |
| Update only contact properties | Name, company, city and country are updated. Subscriptions do not change. |
| Update only subscriptions | Only the ticked subscriptions apply. Properties do not change. |
| Do nothing | The existing contact is left as is and counted as Skipped. |
In the first three cases, the import tags are added to the ones the person already had.
Under Empty fields handling, the Overwrite with empty fields switch is off by default. An empty cell in the file then leaves the existing value untouched. If you turn it on, an empty cell erases the contact's current value.
Start the import and read the result
Click Start import. The button shows Importing... while processing. At the end, the Import completed screen shows the number of contacts processed and four counters.
- New are the contacts created.
- Updated are the existing contacts that were changed.
- Skipped are rows with no valid email and no number, and duplicates left as is with Do nothing.
- Failed are rows that could not be saved. The counter turns red if there are any.
Click Close. The import shows in the history and the contacts in All contacts.
Prepare your file
The expected format
- A
.csvfile encoded in UTF-8, 128 MB at most. - The first line holds the column headers. Each following line is one contact.
- The separator can be a semicolon, a comma or a tab. We detect it from the header line.
- A value that contains the separator must be wrapped in double quotes, as spreadsheets do when exporting.
- 200 columns at most.
From Excel, use Save As and the "CSV UTF-8" type. From Google Sheets, use File, Download, then Comma-separated values. .xlsx files are not accepted.
Here is a valid file.
Email address,First name,Last name,WhatsApp,Company,City,Country,Tags
[email protected],Jean,Dupont,+33612345678,Acme,Paris,France,"trade-show-2026,vip"
[email protected],Marie,Martin,,Corp,Lyon,FR,trade-show-2026
Recognized columns
When a header matches one of these names, the property is chosen for you at the mapping step. Capital letters and spaces around the name do not matter. You can always map a column by hand.
| Property | Recognized headers |
|---|---|
| Email address | email, e-mail, email address, adresse e-mail, adresse email |
whatsapp, whatsapp phone, phone, phone number, téléphone, telephone | |
| First name | first name, firstname, first_name, prénom, prenom |
| Last name | last name, lastname, last_name, nom |
| Full name | full name, fullname, nom complet |
| Company | company, entreprise, société, societe |
| City | city, ville |
| Country | country, pays |
| Tags | tags, tag |
The property list also offers Lifecycle stage, which is never prefilled. The lifecycle badge shown on a contact's profile is computed from their orders, so the imported value does not replace it.
How we read the values
- The email address is lowercased. A malformed address is ignored, and if the row has no number either, it is counted as Skipped.
- The number is converted to international format. A number starting with
+or00is read as international. A national number, like0612345678, is only converted if the Country column gives the country, either as its two-letter code (FR) or its name (France). The safest option is to write numbers with their country code. - The Tags column can hold several tags separated by a comma, a semicolon or a vertical bar
|. Each tag is lowercased. If your file already uses commas as the column separator, wrap the cell in double quotes or separate the tags with a vertical bar. - If the file holds two rows with the same email, the second one updates the contact created by the first.
Paste a list of contacts
Choose Paste details. The steps are the same as for a file, except the first one, Paste.
In the Enter your contacts and their details (one contact per line) area, paste one line per person with values separated by semicolons, for example
[email protected] ; First name ; Last name
[email protected] ; First name 2 ; Last name 2
Commas and tabs work too, which lets you paste cells copied straight from a spreadsheet. Then click Continue to mapping.
If the first line contains recognized headers (see the table above), we use it as headers. Otherwise the columns are named Column 1, Column 2 and so on. We then recognize on our own the column containing @ as email and the column containing numbers of 8 digits or more as WhatsApp. Map the other columns by hand at the mapping step.
When pasting, double quotes do not protect a value. So avoid separators inside values. If the area is empty, the message No data to import appears. If it only contains headers, the message is No contact row to import.
What happens to imported contacts
An imported contact gets the source import, shown in the Details section of their profile. It is not attached to any store. It therefore shows when the store selector is on All sources, and disappears as soon as you pick a specific store.
If the person later orders on your store with the same email or number, their orders are added to their profile.
Error messages at the File step
| Message | Cause and fix |
|---|---|
| Unsupported file type. Use a .csv file | The file does not have the .csv extension. Save it as CSV from your spreadsheet. |
| The file exceeds the maximum size of 128 MB | Split the file into several parts and import them one after the other. |
| The file appears empty or malformed | The first line is empty or unreadable. Check that the file has a header line. |
| The file exceeds the 200 column limit | Remove unneeded columns before importing. |
| Error reading the file | The file could not be read. Save it again as CSV UTF-8 and retry. |
If the import fails during processing, the message Import failed appears and the history row switches to Failed.